Friday, March 23, 2018

Simple Popover in SAPUI5

Display a Popover

Create a new folder Popover in the main Sample folder.

Create a new view Popover view which by default creates Popover controller.

Popover.view.xml

<core:View xmlns:core="sap.ui.core" xmlns:mvc="sap.ui.core.mvc" xmlns="sap.m"
       controllerName="Popover.Popover" xmlns:html="http://www.w3.org/1999/xhtml">
                <Page title="Demo on Popover">
                                <content>                                  
<Link text="Show Image" press="handlePopoverPress"  target="_blank" class="sapUiSmallMarginBegin sapUiSmallMarginTop"/>
                                </content>
                </Page>

</core:View>

Popover.controller.js

sap.ui.define([
'jquery.sap.global',
'sap/ui/core/mvc/Controller',
'sap/ui/model/json/JSONModel'
], function(jQuery, Controller, JSONModel) {
"use strict";

var PopupController = Controller.extend("Popover.Popover", {

onInit: function () {
var oModel = new JSONModel(jQuery.sap.getModulePath("Popover", "/Products.json"));
this.getView().setModel(oModel);

},
handlePopoverPress: function (oEvent) {
if (!this._oPopover) {
this._oPopover = sap.ui.xmlfragment("Popover.PopoverFra", this);
this.getView().addDependent(this._oPopover);
}
this._oPopover.openBy(oEvent.getSource());
}
});

return PopupController;


});


Create a fragment to display the Popover content.

PopoverFra.fragment.xml

<core:FragmentDefinition
xmlns="sap.m"
xmlns:core="sap.ui.core">
<Popover
class=""
placement="right"
initialFocus="email"
contentWidth="200px"
contentHeight="100px"
showHeader="false">
<VBox>
<core:Icon size="2rem" src="sap-icon://attachment-photo" class="sapUiSmallMarginBegin sapUiSmallMarginTopBottom" />
<Text text="This is an attachment icon"/>
</VBox>
</Popover>

</core:FragmentDefinition>

Whenever a popover is added in the view, the model should be set to the dialog also or an dependent should be mentioned so that the data will be binded.

Output:


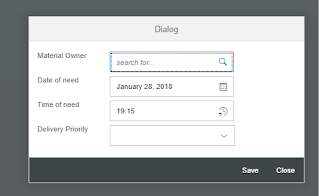
Simple Dialog Box -SAPUI5

Create a Simple Dialog Box 

Create a new folder Dialog in the main Sample folder.

Create a new view Dialog view which by default creates Dialog controller.

Dialog.view.xml

<!-- Popup with vertical and horizontal layout -->

<core:View xmlns:core="sap.ui.core" xmlns:mvc="sap.ui.core.mvc" xmlns="sap.m"
       controllerName="Dialog.Dialog" xmlns:html="http://www.w3.org/1999/xhtml">
                <Page title="Demo on Dialog">
                                <content>
                                                <Button text="Open Dialog" press="onPress">
                                                </Button>
                                </content>
                </Page>

</core:View>

Dialog.controller.js

sap.ui.define([
'jquery.sap.global',
'sap/ui/core/Fragment',
'sap/ui/core/mvc/Controller',
'sap/ui/model/json/JSONModel',
'sap/m/MessageToast'
], function(jQuery, Fragment, Controller, JSONModel, MessageToast) {
"use strict";
var pressDialog;
var CController = Controller.extend("Dialog.Dialog", {
onInit: function () {
// set explored app's demo model on this sample
var oModel = new JSONModel(jQuery.sap.getModulePath("Dialog", "/Products.json"));
var oView = this.getView();
oView.setModel(oModel);
},
pressDialog: null,
onSuggest: function (event) {
var value = event.getParameter("suggestValue");
var filters = [];
if (value) {
filters = [
new sap.ui.model.Filter([
new sap.ui.model.Filter("ProductId", function(sText) {
return (sText || "").toUpperCase().indexOf(value.toUpperCase()) > -1;
}),
new sap.ui.model.Filter("Name", function(sDes) {
return (sDes || "").toUpperCase().indexOf(value.toUpperCase()) > -1;
})
], false)
];
event.getSource().getBinding("suggestionItems").filter(filters);
event.getSource().suggest();
}
},

onPress : function() {
pressDialog = this.getView().byId("ListDialog");
if (!pressDialog) {
pressDialog = sap.ui.xmlfragment("Dialog/DialogFrag", this);
//this.getView().addDependent(pressDialog);
pressDialog.setModel(this.getView().getModel());
pressDialog.open();
}
},
onSave: function(oEvent) {
var msg = 'Saved successfully';
MessageToast.show(msg);
pressDialog.close();
pressDialog.destroy();
},
onClose:function () {
pressDialog.close();
pressDialog.destroy();
},
onExit : function () {
if (pressDialog) {
pressDialog.destroy();
}
}
});

return CController;
});

Create a fragment for the dialog to display.

DialogFrag.fragment.xml

<core:FragmentDefinition xmlns="sap.m" xmlns:l="sap.ui.layout"
xmlns:core="sap.ui.core">
<Dialog title="Dialog" id="ListDialog" afterClose="onAfterClose">
<l:VerticalLayout class="" width="500px">
<l:HorizontalLayout class="">
<Label text="Material Owner" labelFor="owner" width="10em" />
<SearchField id="searchField"  width="15em" placeholder="search for..."
enableSuggestions="true" search="onSearch" suggest="onSuggest"
suggestionItems="{
path: '/ProductCollection',
sorter: { path: 'Name' }
}">
<suggestionItems>
<SuggestionItem text="{Name}"
description="{path:'Price'} {path:'CurrencyCode'}" key="{ProductId}" />
</suggestionItems>
</SearchField>
</l:HorizontalLayout>

<l:HorizontalLayout class="">
<Label text="Date of need" labelFor="date" width="10em" />
<DatePicker id="DP2" value="28-02-2018" valueFormat="dd-mm-yyyy"
displayFormat="long" change="handleChange" class="" width="15em" />
</l:HorizontalLayout>

<l:HorizontalLayout class="">
<Label text="Time of need" labelFor="time" width="10em" />
<TimePicker id="TP1" value="19:15" valueFormat="HH:mm"
displayFormat="HH:mm" change="handleChange" placeholder="Enter meeting start time"
width="15em" />
</l:HorizontalLayout>

<l:HorizontalLayout class="">
<Label text="Delivery Priority" labelFor="priority" width="10em" />
<ComboBox
items="{
path: '/ProductCollection',
sorter: { path: 'Name' }
}">
<core:Item key="{ProductId}" text="{Name}" />
</ComboBox>
</l:HorizontalLayout>
</l:VerticalLayout>

<beginButton>
<Button text="Save" press="onSave" />
</beginButton>
<endButton>
<Button text="Close" press="onClose" />
</endButton>
</Dialog>

</core:FragmentDefinition>

Whenever a dialog box is added in the view, the model should be set to the dialog also or an dependent should be mentioned so that the data will be binded.

this.getView().addDependent(pressDialog);
or
pressDialog.setModel(this.getView().getModel());

Output:


Form,Responsive & Object Page Layout - SAPUI5


Form,Responsive & Object Page Layout


Form Layout:

  • Base layout to render a Form. Other layouts to render a Form must inherit from this one.
  • This control must not be used to render a Form in productive applications as it does not fulfill any design guidelines and usability standards.

Responsive Layout:

  • It renders a Form with a responsive layout. Internally the ResponsiveFlowLayout is used. 
  • The responsiveness of this layout tries to best use the available space. This means that the order of the FormContainers, labels and fields depends on the available space.
  • On the FormContainers, FormElements, labels and content fields, ResponsiveFlowLayoutData can be used to change the default rendering.
  • We suggest using the ResponsiveGridLayout instead of this layout because this is easier to consume and brings more stable responsive output.
  • This control cannot be used stand-alone, it just renders a Form, so it must be assigned to a Form using the layout aggregation.


Object Page Layout:

  • Used to put together all parts of an Object page - Header, Navigation bar and Sections/Subsections.
  • Used as a generic view for displaying blocks of information.
  • It has a header, an optional Anchor bar and contains sections and/or subsections that structure the information.
  • The subsections contain blocks. 
  • This can either be defined in an XML view or built in JavaScript via APIs,

Splitter & Responsive Splitter - SAPUI5

Splitter & Responsive Splitter


Splitter Layout:

  • A layout that contains several content areas. The content that is added to the splitter should contain LayoutData of the type SplitterLayoutData that defines its size and size contraints.
  • By adding or changing SplitterLayoutData to the controls that make up the content areas, the size can be changed programatically. Additionally the contents can be made non-resizable individually and a minimal size (in px) can be set.
  • The orientation of the splitter can be set to horizontal (default) or vertical. All content areas of the splitter will be arranged in that way. In order to split vertically and horizontally at the same time, Splitters need to be nested.
  • The splitter bars can be focused to enable resizing of the content areas via keyboard. The contents size can be manipulated when the splitter bar is focused and Shift-Left/Down/Right/Up are pressed. 
  • When Shift-Home/End are pressed, the contents are set their minimum or maximum size (keep in mind though, that resizing an auto-size content-area next to another auto-size one might lead to the effect that the former does not take its maximum size but only the maximum size before recalculating auto sizes).
  • The splitter bars used for resizing the contents by the user can be set to different widths (or heights in vertical mode) and the splitter will automatically resize the other contents accordingly. 
  • In case the splitter bar is resized after the splitter has rendered, a manual resize has to be triggered by invoking triggerResize() on the Splitter.


Responsive Splitter:

  • ResponsiveSplitter is used to visually divide the content of its parent.
  • It consists of PaneContainers that further agregate other PaneContainers and SplitPanes. 
  • SplitPanes can be moved to the pagination when a minimum width of their parent is reached.

Grid,Grid Layout and Responsive Grid Layout- SAPUI5

Grid,Grid Layout and Responsive Grid Layout


Grid: 


  • Used to make responsive table-free layouts.
  • SAP Fiori utilizes a measuring system using the ‘rem’ unit, which stands for ‘root em’.
  • It positions its child controls in a 12 column flow layout. 
  • Its children can be specified to take on a variable amount of columns depending on available screen size. 
  • With this control it is possible to achieve flexible layouts and line-breaks for extra large-, large-, medium- and small-sized screens, such as large desktop, desktop, tablet, and mobile. 
  • The Grid control's width can be percentage- or pixel-based and the spacing between its columns can be set to various pre-defined values.
  • Content controls within the layout.
  • hSpacing,vspacing,position are to be adjusted as per the requirement.
Grid Layout:


  • This FormLayout renders a Form using an HTML-table based grid. This can be a 16 column grid or an 8 column grid. 
  • The grid is stable, so the alignment of the fields is the same for all screen sizes or widths of the Form. Only the width of the single grid columns depends on the available width.
  • To adjust the appearance inside the GridLayout, you can use GridContainerData for FormContainers and GridElementData for content fields.
  • This control cannot be used stand-alone, it just renders a Form, so it must be assigned to a Form using the layout aggregation.
  • The GridLayout can be attached to the Form Control in order to arrange the Elements in a cell based Layout. The Form Control consists of a Form on top level which contains several FormContainers with several FormElements in it. According to our layout concept all of these can have LayoutData attached to them.
  • In this case you cannot include halfGrid Containers. Within the default Grid the FormContainers you can also place two containers in one row by setting halfGrid true within the respective GridContainerData attached. 
  • The FormElements included can then have hCells and vCells set as GridElementData attached to the respective labels and fields in order to get the different arrangements within the grid. 
  • You can also add some dummy FormElements in order to get some spare rows or dummy TextViews in order to get some spare cells.
  • In addition when using the arrow keys you are able to move up (Arrow Up) or down (Arrow Down) within the Form Fields.
Responsive Grid Layout:


  • This can be attached to the Form Control in order to arrange the Elements in a responsive way (see Grid). 
  • The size and arrangement of the single elements depends on the size of the screen. 
  • The Form Control consists of a Form on top level which contains several FormContainers with several FormElements in it. 
  • According to our layout concept all of these can have LayoutData attached to them.
  • You can use GridData on FormContainers and the content controls like in the Grid control. So it is possible to influence the linebreaks and size (spans) of the single elements. On FormElements GridData is not supported. To influence the rendering of the Labels and fields GridData must be set for these controls. 
  • If no GridData are used on a FormContainer or Control, the ResponsiveGridLayout tries to calculate the linebreaks and spans. If the provided GridData are very complex, this automatism may not bring the expected result. In this case GridData should be set on all affected controls.
  • Breakpoints,eampty spans,no of columns,span labels have to be mentioned to obtain required output.

Various Layouts in SAPUI5

Various Layouts in SAPUI5


1. Vertical Layout & Horizontal Layout:  

  • Simple way to align multiple controls vertically or horizontally.
  • Content controls within the layout.
  • All controls inside are not enabled automatically.
  • Content width is used as default width.
  • There is no default scrolling inside the layouts.

2. FlexBox:

  • FlexBox control builds the container for a flexible box layout.
  • justify-content,direction can be used to align the content
  • Based on the renderType the flexbox is wrapped in a div or li or ul.
  • FlexItemData Holds layout data for a FlexBox / HBox / VBox.


  • VBox:The VBox control builds the container for a vertical flexible box layout. 
  • HBox:The HBox control builds the container for a horizontal flexible box layout. 
  • VBox & HBox are a convenience control, as they are just a specialized FlexBox control.


3. Grid,Grid Layout and Responsive Grid Layout

4. Splitter & Responsive Splitter

5. Form,Responsive & Object Page Layout


Thursday, March 22, 2018

SAPUI5 Form- Display,Edit & Save

SAPUI5 Form- Display,Edit & Save

Check the below link to create a form and display.
http://sapui5starter.blogspot.com/2018/03/display-simple-form-sapui5.html

To edit the form buttons for edit and save to be added in view and their actions should be added in controller.

PInfo.view.xml

             <footer>
<Bar>
<contentLeft>
<Text text="@Copyright-ASML"></Text>
</contentLeft>
<contentRight>
<Button id="edit" text="Edit" press="handleEditPress" />
<Button id="save" text="Save" type="Emphasized" visible="false" press="handleSavePress" />
<Button id="cancel" text="Cancel" visible="false" press="handleCancelPress" />
</contentRight>
</Bar>

</footer>

Add the above code in PInfo view in the <Page> block.

PInfo.controller.view

                       handleEditPress : function () {

      //Clone the data
      this._oSupplier = jQuery.extend({},                            this.getView().getModel().getData().SupplierCollection[0]);
      this._toggleButtonsAndView(true);

      },

      handleCancelPress : function () {

      //Restore the data
      var oModel = this.getView().getModel();
      var oData = oModel.getData();

      oData.SupplierCollection[0] = this._oSupplier;

      oModel.setData(oData);
      this._toggleButtonsAndView(false);

      },

      handleSavePress : function () {

      this._toggleButtonsAndView(false);

      },

      _toggleButtonsAndView : function (bEdit) {
      var oView = this.getView();

      // Show the appropriate action buttons
      oView.byId("edit").setVisible(!bEdit);
      oView.byId("save").setVisible(bEdit);
      oView.byId("cancel").setVisible(bEdit);

      // Set the right form type
      this._showFormFragment(bEdit ? "Change" : "Display");

      }


Add the above code in PInfo controller to toggle the buttons and save,edit,cancel actions.

A fragment Change.fragment.xml to be added to modify the displayed data.

 Change.fragment.xml

<core:FragmentDefinition
xmlns="sap.m"
xmlns:l="sap.ui.layout"
xmlns:f="sap.ui.layout.form"
xmlns:core="sap.ui.core">
<VBox class="sapUiSmallMargin">
<f:SimpleForm id="SimpleFormChange"
editable="true"
layout="ResponsiveGridLayout"
title="Address"
labelSpanXL="3"
labelSpanL="3"
labelSpanM="3"
labelSpanS="12"
adjustLabelSpan="false"
emptySpanXL="4"
emptySpanL="4"
emptySpanM="4"
emptySpanS="0"
columnsXL="1"
columnsL="1"
columnsM="1"
singleContainerFullSize="false" >
<f:content>
<Label text="Name" />
<Input id="name" value="{SupplierName}" />
<Label text="City" />
<Input id="Citys" value="{City}"></Input>


<Label text="Country" />
<Select id="country" selectedKey="{Country}">
<items>
<core:Item text="England" key="England"/>
<core:Item text="Germany" key="Germany"/>
<core:Item text="USA" key="USA"/>
</items>
</Select>

<Label text="Tel" />
<Input id="Tel" value="{Tel}"></Input>

<Label text="Email" />
<Input id="Emails" value="{Email}"></Input>

<Label text="Twitter" />
<Input id="TEmail" value="{Twitter}"></Input>

</f:content>
</f:SimpleForm>
</VBox>

</core:FragmentDefinition>

Output:


Source: https://sapui5.hana.ondemand.com/